Showing posts with label Nursery Decor. Show all posts

Friday, April 13, 2012

Where she sleeps...

The nursery is finally completed! I am excited to share it with you all, as it has been a big project of mine ever since we found out we were having a girl. I wanted to do something unique, not so "baby" (like I did in my sons room) and I knew I definitely wanted to include some things that I made to complete the room. Thanks to Pinterest I got some great ideas and was able to organize all of my design ideas.

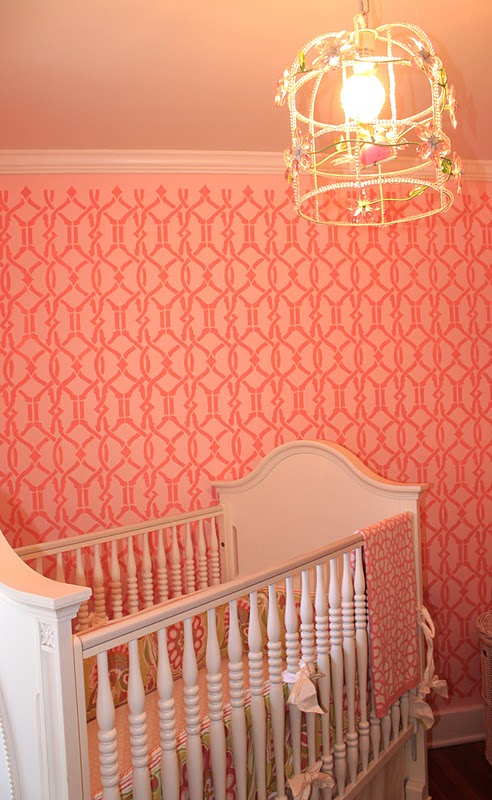
I am sure most of you have seen this light fixture on one blog or another. It is from Ikea and the moment I spotted it, I knew I had to have it. I was on a tight budget for this room, so the $50 price tag worked just great for me. It was a pain in the ass to assemble, but worth every minute!

I used the old curtains from my son's room (cheapies from Target!) and added hot pink pom trim (Hobby Lobby) with a hot glue gun. I LOVE the way they turned out. I am kind of obsessed with pom pom trim right now...

The hot pink mirror was one I found at Vintage Market ($35!) in Kansas City and my mom and I used acrylic paint to make it hot pink.

I desperately wanted to do a sheepskin rug in the room, but I didn't want to eat up my budget with a $300-$400 rug.The $74 Chevron option from Urban Outfitters will do the job and I liked the idea of using a bolder print on the floor.


The majority of my budget went into the wallpaper. I knew I wanted to do this on the crib wall, it was just a matter of finding the perfect print. I decided to go with this dainty metallic silver leaf print from Thibault. It is very feminine and I think a print that we will not tire of.

I re-purposed an old pillow with this fun pink and ivory floral print and the white pillow with pom trim as well as the JellyCat Giraffe is from Lauren Alexandra Bebe Boutique in Kansas City.


The diaper caddy is from HomeGoods
Shelf is an old purchase from Pottery Barn (we painted the insides hot pink)
My mom and I made the artwork on the shelf


The tiny boudoir chair was my Granny's that I had recovered with fabric from Calico Corners. The whole chair was $180 to re-purpose. I love it and hope our little girl will too!


This print from Etsy inspired a lot of the colors we used in the room. By The Wheatfield

I am obsessed with these Grey Baby Bloch shoes that were given to me at my baby shower!


Dress by Toni Tierney at Lauren Alexandra Baby Boutique


Amy Butler Lark Print pillow by Pillow Mio
Turqoise and white Flower Pillow from Hobby Lobby
Little Giraffe Hot Pink Blanket

For more details on the nursery and all of my resources visit: Projectnursery.com

Monday, February 20, 2012

Sutton's Sanctuary...

My friend Tiffany is expecting her first baby any day now. What baby Sutton doesn't realize is what a lucky little guy he will be. Not only does he have the best parents, but he will also be coming home to a gorgeous room that any child would love. The room is bright and cheerful with some fantastic unique pieces.

The focal point of the room is definitely this chandelier which was custom made for her by Whimsical Collection on Etsy. Tiffany sent the designer a picture of her bedding and they were able to coordinate the colors. It's hard to tell, but the center part of the chandelier is hand painted with orange and aqua to match the bedding. It's a fantastic piece and it really ties the room together!


The adorable Giraffe floor lamp was a gift from Tiffany's Mother in law. It's so adorable and ties in the animal theme from the bedding.
The artwork is Oopsy Daisy from Lauren Alexandra in Kansas City
Rug is Pumpkin Frame Rug by Serena & Lily


Tiffany took basic white onesies and had them monogrammed for baby Sutton. Such a cute (and inexpensive) way to personalize clothing for your little one.

Our friend Rachel made the artwork that is on either side of the windows


And I couldn't resist taking a picture of Tiffany's first "baby" Lola. She loves the room too!!!


We love you Tiffany and we can't WAIT to meet baby Sutton!

Thursday, January 19, 2012

Nesting...


What did we do without Pinterest? Honestly, for me it is the best invention ever. I think especially if you are decorating, it's a genius way to organize all of your ideas...or even get inspiration!

I have really loved being able to see all my ideas for her room all in one spot. I have pinned a lot of items on my wish list and it has helped me narrow down my decisions. Who knew that doing one tiny room could be so much work? I give all of you decorators out there a lot of credit!

Here is a collage I made with color inspiration as well as some of the items we have already purchased for the room. I can't wait to see it all come together! I am hoping to have it all done by the first week of March....with pics to come, obviously :)

Thursday, September 29, 2011

For a Boy and a Girl

My friend was looking for inspiration for her twins (one boy, one girl) bedroom. Eventually they will be moving them out of their cribs into big kid beds, so she was trying to come up with a theme for the room that would accommodate both children. I have to say, it's not an easy task!

My suggestion was to go neutral or soft blue on the walls which ties in great with pinks, greens and yellow.

Of all the images on Pinterest, my favorite is this grey, green and blue room. It's still juvenile enough for little ones, but would transition nicely as the kids get bigger.


This room is so bright and cheerful, what child wouldn't love to hang out here?
I like how they mixed so many vibrant colors in this twin room


The muted walls are the perfect backdrop for bright headboards and pillows


Monday, September 19, 2011

Pretty in Pink: A nursery for sweet Kitty

2 weeks ago I posted the awesome boys room that my friend Rachel did. Well, here is her new baby girl's room. Katherine, but affectionately known as Kitty is the first girl in the family, so after years of doing boys room Rachel was ready for some PINK!
Feature wall was hand stenciled by Rachel using cutting edge stencils
custom curtains made by Calico Corners
Throw by Dwell Studio


and the icing on the cake? I got to style and photograph sweet Kitty. Isn't she the cutest?


Sunday, September 4, 2011

Boyish Sophistication

You may remember my friend Rachel, as I featured her on my Super Model Mom series a few months back. You also may have seen her fabulous Scooby Doo party posted on P is for Party. Well, I am bringing Rachel back to share with us her sons new GORGEOUS bedroom. Seriously, it's to die for. It's the perfect mix of boyish sophistication. From top to bottom, Rachel didn't miss a beat...


The curtains were made by Calico Corners using a Ralph Lauren fabric
The lamps are "Kub" from Lite Source (Amazon.com)
The blue quilt and sham are Ralph Lauren Palm Harbor collection (which I just saw is discontinued and at a great price on ralphlauren.com)
The orange blanket is Z Gallerie
 The bed skirt is Pottery Barn
The headboards are FabricWorkroom.com
The rug is JC Penney


All of the animal artwork is handmade by Rachel. She was so kind to put together her "how to" make these adorable animal silhouette prints.


The art does not require any artistic ability; the most important things are a great pair of small craft scissors (splurge on the best one - you won't regret it), a good staple gun, spray adhesive and fabric glue. Once you've decided on your subject, do a Google Image search for a silhouette. Depending on how large you want your subject, you can print it onto standard paper (like I did for the elephants) or use a projector to enlarge an image and trace it onto posterboard (like I did for the giraffe). If you can't find what you need, you can always freehand (like I did with the attached dog image which was in Will's old room)
Next, hit the fabric store - I got everything for the boys' room at Jo-Ann Fabrics & Crafts. Start with a canvas of any size from the art department. You can cover it with a vinyl or (p)leather material (like the red material in the attached) from the home fabric section, which is so heavy that it does not need any batting. If you're using a standard fabric, you'll need a thin batting (also in the fabric section on large spools) so that the fabric lays smoothly. Don't just look in the fashion fabric section - some of the more fun, graphic prints are in the home section - especially the outdoor fabric lines. If you buy the canvas, fabric and batting at the same time, the fabric department can cut the latter two to fit the frame. While you're there, pick up small cuts of the 2 contrasting fabrics for your "subject" and its background (I highly recommend a sturdy vinyl/pleather for these if your subject has a lot of detail)... and some trim to outline it (rope, pom pom trim ,etc).
To assemble, use a staple gun to attach the vinyl or batting to the canvas - pulling it taught to eliminate any wrinkles. If you're using batting and fabric, you won't want to pull the fabric quite as hard or it will pucker. If you have a busy pattern, make sure it's aligned well in front before you start to staple in the back.  If you do get wrinkles or puckers, it's easy to remove the staples and start over.
Next, cut the background for your subject (I use a plate or cup to trace a circle and I print out more complex shapes). To cut the subject, use tape to adhere the paper to the fabric and carefully cut the outline (I use lots of small pieces of tape so that the uncut portion doesn't shift at all as you go along). Use a light coat of spray adhesive (OUTSIDE! - this gets everywhere) to adhere the background to the fabric and then smooth it out to avoid any bubbles. Use the fabric glue to adhere the subject to the background - if it's a complex design with small details, use a brush to apply the glue so that it doesn't bleed. The final touch is using the fabric glue to apply the trim to the outside of the background.


ABSOLUTELY adorable! Thank you Rachel for sharing all of your resources and DIY artwork. I bet your boys are in LOVE with their new room.

And stay tuned, Rachel just had a baby girl and I will be sharing her nursery with you later this week!

Tuesday, April 5, 2011

Chirp Chirp, Tweet Tweet

I love the use of birds in home decor. If I ever have a little girl, I would love to incorporate some birds into the nursery. As I was looking through my Etsy favorites, I realized that I had (not on purpose) bookmarked a bunch of adorable Bird Items. These are just a few of my faves...


Sunday, January 16, 2011

Artwork to inspire...

When designing a room, something as simple as a piece of artwork can inspire your entire theme. I have always been obsessed with Orange and Pink, so when I saw this piece of Art on Serena and Lily, it got me thinking about what I would do if I could decorate a little girls room...


via BHG.com


Saturday, January 15, 2011

PetitNest

Remember Lonni from HGTV's Design Star? Well, she paired up with Tiffani Amber Thiessen to create a really beautiful line of Nursery Furniture and Decor called PetitNest. I have to say, I think the pieces are gorgeous and totally unique from anything I have seen in the realm of baby furniture...


But, really, would all of you pay $1500 for a crib and $1600 for a dresser? I just don't know! The dresser MAYBE but for a crib that is only used for 3 years, I think it is kind of hard to justify!

Monday, January 3, 2011

Lottie da...

This adorable line of little girls clothing by Lottie Da has made pattern mixing an artform. I am in love with all of her color combos and the whimsical fabric choices. For those of you with little girls, eat your heart out...


and her crib bedding is absolutely adorable...


LinkWithin

Related Posts with Thumbnails